

Before You Begin
Of course, as with any home decor/DIY/renovation project, take a moment before you begin to ensure you have a plan. A critical first step in the decor process is preparing the walls!
Measure
The importance of measuring your wall or walls in question cannot be overstated, whether you’re working with a small or large area. Knowing the square footage of your space will allow you to make decor decisions further down the road—how much paint and primer you’ll need, how much available space you have to decorate with.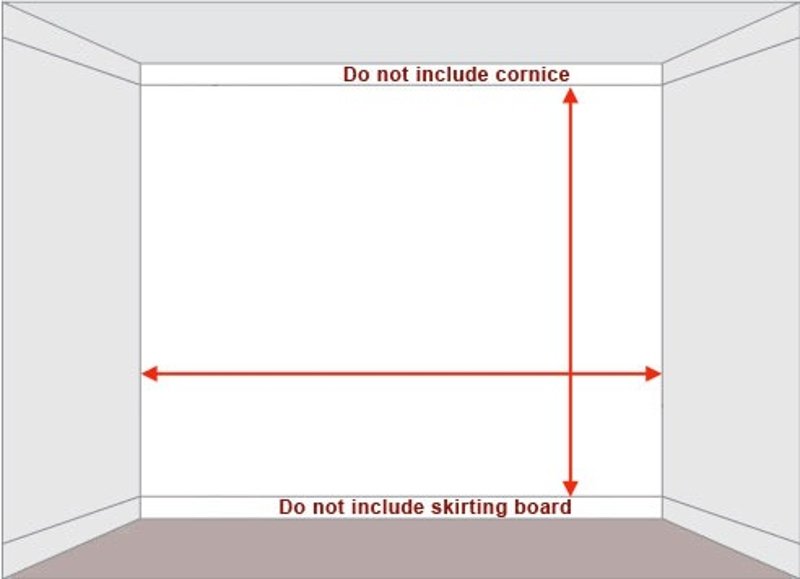
Decide Purpose/Longevity
Consider your own changing tastes as well as the length of time you will be using the space. The purpose of the room is constantly changing, or you plan to move within a couple of years, merely applying a fresh coat of paint to a room might give it the lift it needs!
When it comes to wall murals, knowing how long you’ll stay in a space may affect the type of mural that you get; if you know you’ll be moving in a few years, consider getting a removable, reusable peel-and-stick wall mural!
How to Prep with Textured Walls
Having textured walls can be a hindrance to applying paint evenly or other forms of decoration. Wall textures that have a light orange peel or smoother texture are generally acceptable to cover with a wall mural. This is a crucial part of prepping a wall for a wall mural or for painting!
Drywall and Paint Texture
Light orange peel wall texture and smoother is acceptable for a wall mural. If you have other texture styles: popcorn, comb, stomp brush, you’ll need to smooth out the wall before you do anything. NOTE: If you have popcorn texture and your home was constructed before the 1980s, the popcorn might contain asbestos. If you know for a fact your popcorn texture was added before 1989 or are unsure of the date, you may need to get it tested.

However, for most walls, you can simply either scrape and sand the walls or add a skim coat. Sanding down the walls is a subtractive process—smoothing down the wall—while a skim coat is an additive process—smoothing out the wall by adding layers of drywall mud or joint compound. For more detailed information on removing texture from a wall, check out this article!
After either of these techniques, add a coat of Zinsser Gardz sealer to prepare your wall for mural application!
Scrape and Sand
The scrape and sand technique only works if the drywall layer has not been previously painted. If it has, you’ll have to skim coat.
In short, prep by covering floors and furniture with a canvas drop cloth, not plastic. Then spray the walls with water, allowing a 15-minute soak. At this point, you should be able to remove the texture simply with one finger.
At this point, grab a scraper, a bucket, and get to work! Hold the scraper at a 30-degree angle as to not puncture the drywall. If the texture becomes difficult to remove, stop, and spray again. Because of this, it’s probably best to work in smaller sections.

Once the texture has been removed, sand down the walls. Make sure to wear a mask!
Skim Coat
Cover your furniture and floors with canvas and cover the baseboard with painters tape.
If the paint on your walls is very glossy, you’ll need to lightly sand down the wall using a sanding pole or sanding block. Once this is completed, wipe down the wall with a lint-free rag or towel.

Working in small areas so as not to let the joint compound dry, add the compound to the wall, using a drywall taping knife and putty knife. Make sure that the area is flat before moving on to the next.
Let the wall dry for 48 hours. If the wall is still not flat, consider adding a second layer.
Wallpaper
If your wall surface is already covered with existing wallpaper, you may just be in luck.
Generally, you are able to apply wall murals to existing wallpaper, but this means that the mural is not adhering to the wall, but rather the wallpaper. If the wallpaper is in good condition, with no rips, tears, or bubbles, you’d have no issue putting a mural over it—except for vinyl wallpaper. Wall murals cannot be applied to vinyl wallpaper, which will have to be removed.
How to Prep with Painted Walls
If you have non-textured paint on the wall, you may need to do a little bit of prep in some cases, depending on the kind of paint. Matte, eggshell, or other flat paints require adding a layer of sealer for the mural to adhere properly. Satin paint or anything more glossy than satin is acceptable and does not require a sealer.

We recommend, as a sealer, Zinsser Gardz, which is a water-based sealer that promotes mural adhesion on oil-based paints, water-based paints, and drywall! It’s great if you have cracked or flaking paint in small amounts.
Allow the sealer to dry completely before installing your mural, per the manufacturer’s instructions.
Cleaning the Wall
Cleaning the wall is the final step in the wall prepping process. Once the wall has been de-textured and primed, you’re very nearly ready to apply your mural!
Rinse your wall down with soap and warm water. Dry with a lint-free towel. Once the wall is 100% dry, you’re now ready to apply your mural!
Here are our instructions for applying a peel-and-stick mural, a traditional prepasted mural, and a paste-required mural.